
Water activities can do more than entertain a child for a few minutes. When they are set up with intention, they strengthen coordination, concentration, independence, and the habit of finishing a task from start to clean finish. That is why Montessori water play works best when it looks calm, purposeful, and small enough for a child to manage well.
What matters most before you set up a water activity
- Choose one clear job, such as pouring, transferring, washing, or wiping, instead of offering a pile of random tools.
- Keep the setup child-sized and shallow so the child can succeed without constant rescue.
- Match the task to the child’s stage, because a spoon transfer and a dropper task are not equally demanding.
- Safety is part of the lesson: stay close, reduce clutter, and keep the floor dry enough for confident movement.
- The simplest setup is often the strongest one, especially if you want repeatable use at home.
Why water work fits Montessori so naturally
Montessori method leans hard into real activity, real materials, and real cause-and-effect. Water gives all three at once. A child can see the result of a careful pour, a spill, a squeeze, or a transfer, and that instant feedback keeps the task meaningful without needing extra noise or novelty.
I think that is the real advantage here: water is interesting on its own, but it also reveals control. A toddler learns that a steady hand matters. A preschooler learns that a funnel changes the path of the water. Both are doing practical life work, not just sensory entertainment.
That is also why I prefer water tasks with a beginning, middle, and end. Fill, work, dry. Once the child understands that rhythm, the activity stops feeling like a mess and starts feeling like a job. From there, the next step is choosing the right task for the child’s age and attention span.
Activities that match each stage of development
The best water-based activities are not the most elaborate ones. They are the ones a child can repeat with minimal help. I usually think in stages: simple control first, then transfer, then more precise coordination.
For younger toddlers
- Pouring from one large container to another
- Squeezing a sponge into a bowl
- Wiping a small spill with a cloth
- Lifting and carrying a small pitcher with two hands
These activities are short, but they build a lot. The child is learning grip, balance, and focus while still working within a safe range of motion. I would keep the tools chunky and the water shallow at this stage.
For older toddlers
- Funnel pouring into a narrow-necked container
- Spoon transfer from bowl to bowl
- Using a turkey baster or large dropper
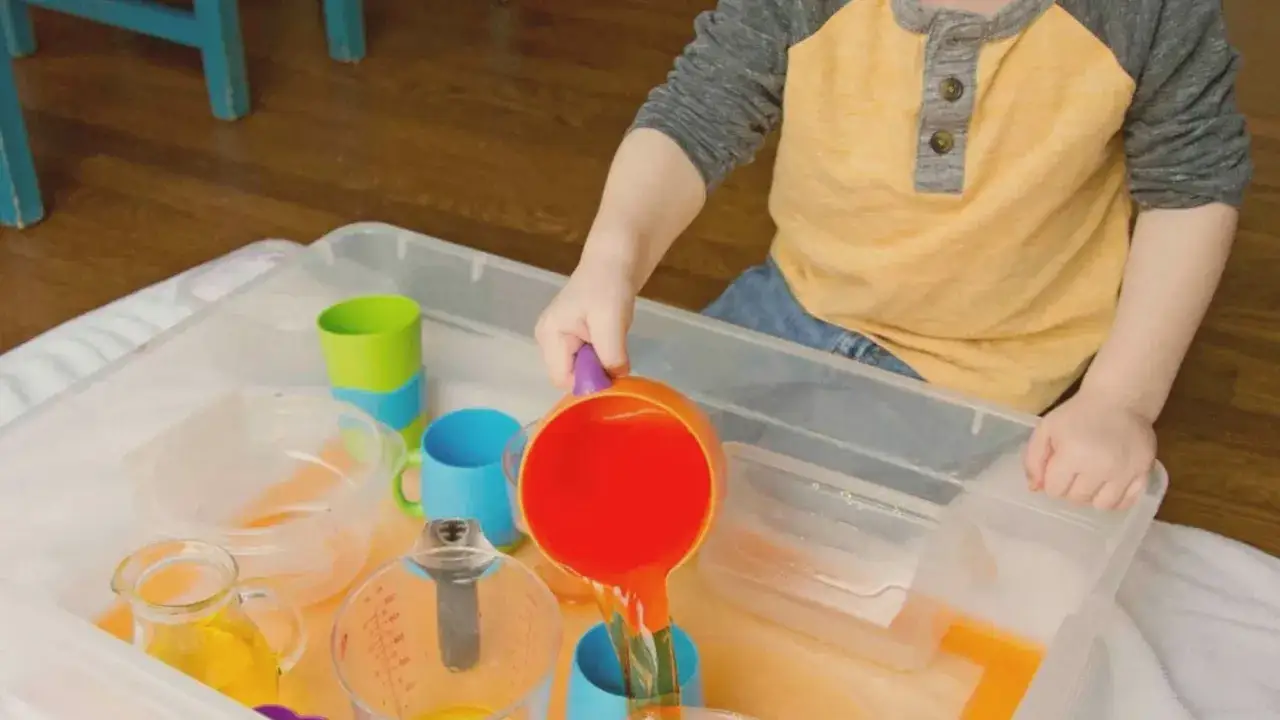
- Washing a toy, vegetable, or small dish
This is usually where water work becomes more obviously Montessori. The child is not only moving water; the child is practicing sequence, control, and follow-through. A good task here has one clear outcome, such as moving water without spilling or cleaning an object from start to finish.
Read Also: Montessori Nature - Beyond Decoration: Practical Guide
For preschoolers
- Measuring water with cups or marked pitchers
- Plant care and watering with a small can
- Dishwashing with a child-sized brush and cloth
- Floating and sinking with a simple sorting tray
At this stage, I like to add a little more precision, but not more clutter. The child should still be able to complete the work independently. If the setup starts to look like a science fair, it usually has too many variables and not enough purpose.
Once the activity matches the child, the environment matters just as much as the task itself, so I move next to the setup.
How I set up a calm water station at home
If I want the child to stay focused, I keep the space plain and predictable. A low tray, a towel, a small water container, and one or two tools are usually enough. More pieces often create more handling than learning.
- Choose a stable surface, such as a floor mat, low table, or small tray.
- Put down an absorbent towel or mat before any water goes on the surface.
- Use a shallow fill, usually about 1 to 2 inches of water for toddlers.
- Offer one main tool and, at most, one backup tool.
- Show the motion slowly once, without overexplaining.
- Let the child repeat the task, then finish with drying and putting materials away.
I also like to keep the presentation clean. A child sees the work more clearly when the tray is uncluttered, the towel is nearby, and there is a visible place for every item. That kind of order is not decorative. It lowers friction and helps the child act independently.
If you are deciding what kind of setup to buy or use, the next comparison will save time and money.
Which setup fits your space and budget
Not every family needs the same kind of water station. A tray works well for focused practical life work. A water table is better when multiple children need room. A sink-based activity can be excellent for washing and pouring, but it needs more adult access. The right choice depends on the space you have and how much structure you want.
| Setup | Best for | Typical cost in the U.S. | Strengths | Trade-offs |
|---|---|---|---|---|
| Shallow tray or basin | One child, one task | About $10-$25 | Simple, portable, easy to store | Limited space for larger tools |
| Water table | Siblings, outdoor use, longer play sessions | About $40-$150 | More room for pouring, scooping, and floating work | Needs space and can invite splashing if the task is unclear |
| Sink-based work | Washing produce, dishes, and hands-on practical life | Usually low cost if the sink is already available | Real-world, authentic, easy to reset | Less portable and more dependent on adult access |
| Foldable tub or outdoor basin | Seasonal play, patio use, warm weather | About $15-$40 | Good for larger water movement and outdoor cleanup | Must be drained and dried after each session |
If I had to choose only one option for a younger child, I would start with the simplest tray or basin. It creates the strongest Montessori feel because the child can see the whole task at once. The child does not need a flashy feature; the child needs a clear job.
Whatever setup you choose, safety and cleanup have to be built into the routine, not treated as an afterthought.
Safety and cleanup that keep the lesson intact
Water play should feel calm, not risky or chaotic. For toddlers, that means staying close, keeping the water shallow, and removing distractions. A child this age does not need a dramatic amount of water to learn; a small amount is usually enough to make the work meaningful.
- Stay within arm’s reach, especially with younger toddlers.
- Use a non-slip mat or rug under the work area.
- Keep the water shallow and the container stable.
- Use one towel for hands and one for spills so cleanup stays organized.
- Empty standing water promptly after the activity ends.
- If you are outside, add shade and sun protection before starting.
I also avoid overloading the child with too many objects in the water. Too many cups, boats, animals, and scoops usually shifts the work away from concentration and toward chaos. If the child is focused on launching toys instead of completing a task, the setup is no longer serving the Montessori purpose.
And if you are tempted to keep the activity going by adding one more novelty item, that is usually the moment to step back and simplify. The lesson should feel complete before the child gets tired.
Mistakes that turn a good idea into a mess
Most water activities fail for predictable reasons. The problem is rarely the water itself. It is usually the way the activity was framed, sized, or timed.
- Using too much water for the child’s age
- Giving too many tools at once
- Skipping the demonstration and expecting the child to guess the sequence
- Choosing a task that is too advanced, such as a tiny dropper before simple pouring is mastered
- Replacing practical tools with novelty toys that distract from the work
- Taking over the cleanup instead of letting the child finish the cycle
My strongest rule here is simple: if the child cannot complete the activity with dignity, the setup is too hard. That may mean less water, a wider container, or a simpler tool. It may also mean repeating the same work for several days before adding anything new. Repetition is not a flaw in Montessori water work; it is the engine that makes it useful.
Once the activity is stable, you can keep it fresh without making it complicated.
Small routines that keep the learning going
The most effective water work is often the most ordinary. One week, the child pours between two pitchers. The next week, the child washes vegetables before dinner. Later, the child waters a plant and wipes the tray dry. That kind of rotation keeps the work interesting while preserving the order children need.
I like to think of it this way: one simple water station can support weeks of meaningful practice if you change the purpose, not the whole environment. That approach saves money, reduces clutter, and gives the child the repetition needed for real skill building.
If you are starting from scratch, begin with one shallow container, one child-sized pitcher, one sponge, and one towel. That is enough to create a focused, practical routine that supports concentration, independence, and careful movement without turning the room into a splash zone.