
A good toy room has to do two things at once: invite play and survive cleanup. This toy room inspiration guide focuses on the parts that matter most in a real home: layout, storage, style, safety, and the small decisions that keep a room from turning into a dump zone by next week. I’m aiming for ideas you can actually use in a nursery, a spare bedroom, or a shared family space.
The fastest way to make a toy room feel organized
- Start with the kind of play you want to support, not with decor.
- Divide the room into clear zones so every toy has a natural home.
- Use low, visible storage that children can manage without help.
- Mix open and closed storage to balance access with visual calm.
- Choose one strong style direction and keep the rest simple.
- Plan for a weekly reset and a toy rotation every 2 to 4 weeks.
Start with the kind of play you want to support
I always begin here because it saves money and frustration later. A room for a toddler, a preschooler, and a mixed-age sibling setup all need different things. If the child spends most of the day building, reading, dressing up, or doing sensory play, the room should reflect that instead of trying to hold every toy in one big pile.
For me, the simplest way to think about it is this: the room should match the play pattern. A younger child needs easy reach and obvious storage. A child who loves pretend play needs hooks, baskets, and maybe a small costume rail. A child who reads a lot needs a quiet corner that feels separate from the busy floor area.
I also like to limit the room to one main purpose and one supporting purpose. For example, the room can be mostly for open-ended play with a small reading nook, or mostly for art with a compact pretend corner. That kind of focus makes the space feel intentional instead of crowded. Once that is clear, the layout becomes much easier to design.
Next, I turn that purpose into physical zones so the room can actually function day to day.
Create zones before buying decor
One room feels calmer when each activity has a place. I like to think in terms of four small zones: floor play, books, creative work, and a quiet corner. That keeps the room readable for a child and much easier to reset for an adult.
| Zone | What belongs there | Storage that works best |
|---|---|---|
| Floor play | Blocks, cars, dolls, animal figures, train sets | Low cubbies, open bins, shallow baskets |
| Reading corner | Board books, pillows, a small lamp, soft seating | Front-facing book ledges, a book basket, wall shelves |
| Creative zone | Crayons, paper, stickers, puzzles, paint supplies | Rolling cart, shallow drawers, labeled trays |
| Pretend area | Dress-up pieces, play food, dolls, a kitchen set | Hooks, garment rail, medium baskets, a mirror |
That table is simple on purpose. I do not want the room to need a room map just to be usable. The best zones are the ones children can understand without instructions. If a child can look at a shelf and know where the books go, the room already feels more peaceful.
If you have room for one extra detail, add a small “reset spot” near the door or closet. That is where I put returned toys, missing pieces, and items waiting to be rotated. It prevents random clutter from drifting into the rest of the room. From there, the next question is storage, because zoning only works if the storage is easy to use.
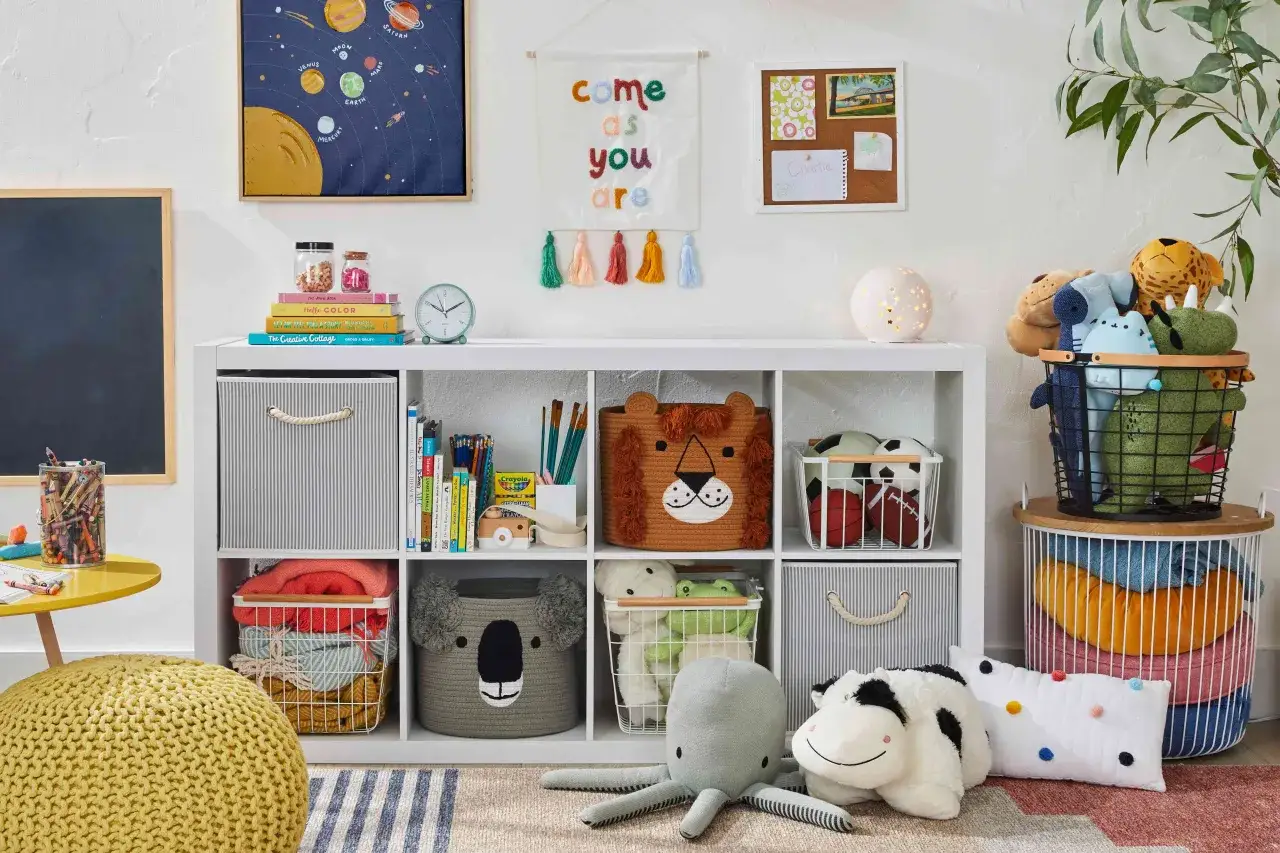
Choose storage children can manage themselves
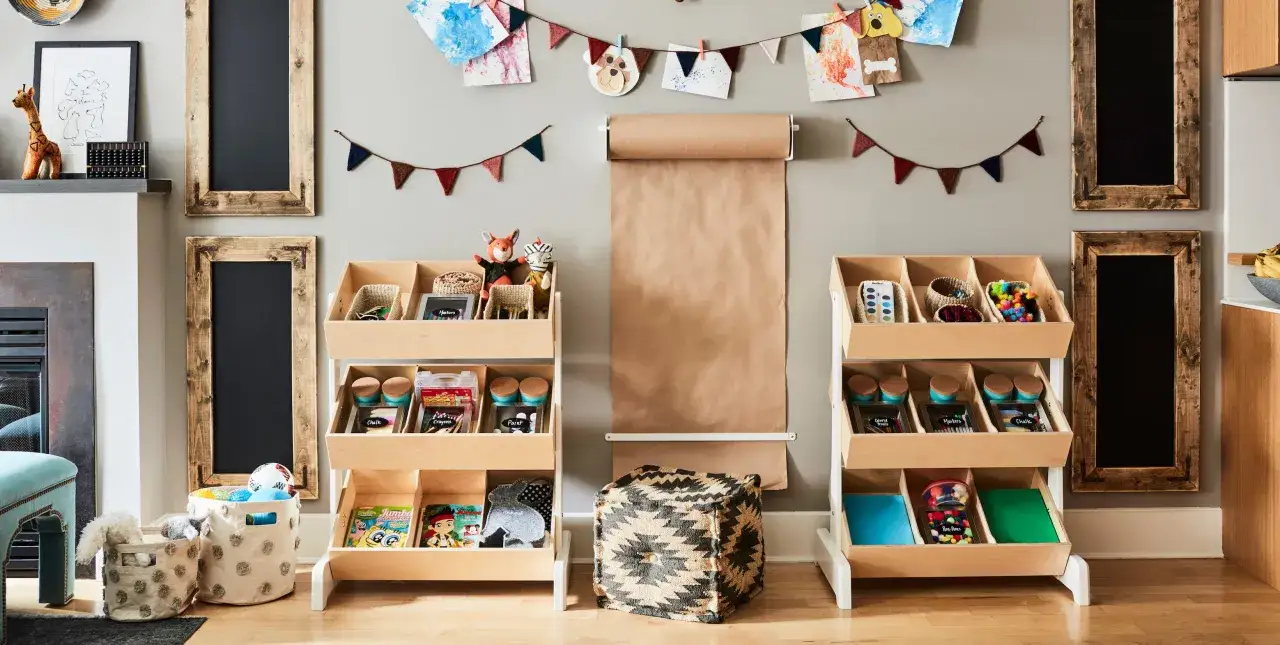
I prefer storage that a child can actually open, see into, and put back without a debate. Deep toy chests look tidy for about five minutes, but they often turn into catch-alls. Low shelves, cube units, baskets, and labeled bins work better because they make the system visible.
| Storage type | Best for | Main advantage | Main limitation |
|---|---|---|---|
| Open cubbies | Blocks, cars, puzzles, dolls | Easy for kids to see and reach | Can look busy if every bin is full |
| Lidded bins | Loose sets, sensory toys, backup supplies | Hides visual clutter fast | Kids need labels to remember what goes where |
| Closed cabinets | Crafts, off-season toys, parent-managed items | Best for keeping the room calm | Less child-friendly if used for daily toys |
| Wall shelves | Books, display toys, small collections | Saves floor space | Not ideal for heavy or messy items |
| Rolling carts | Art supplies, rotating activities, small projects | Flexible and easy to move | Can become cluttered if not sorted regularly |
The system works best when I keep categories narrow. One bin for cars, one for figures, one for blocks, one for dress-up accessories. The moment a bin becomes “miscellaneous toys,” cleanup gets slower and the room gets messier.
I also use picture labels for younger children and plain word labels for older ones. That tiny change matters more than decorative storage ever will. If a child can match the label to the contents, tidying becomes a skill instead of a chore.
For bigger collections, I prefer toy rotation. I keep roughly one-third of the toys out and store the rest elsewhere, then swap them every 2 to 4 weeks. The room stays fresher, children focus better, and you do not need to buy new toys just to create interest. Once the storage system is working, style becomes easier to layer on top without adding noise.
Pick a style that feels playful without visual noise
A toy room does not need to be loud to feel fun. In fact, the prettiest rooms I see usually follow one simple rule: one strong idea, then restraint. That could mean a mural, a bold rug, a graphic wallpaper strip, or a single color family that runs through the room.
Soft and calm
This approach works well in nursery-playroom hybrids and smaller rooms. I lean into warm whites, oat, sand, muted green, or dusty blue, then add texture through a woven basket, a washable rug, and soft lighting. It feels calm without feeling empty, which matters when the room has to support naps, quiet reading, and toy time in the same footprint.
Bright and graphic
If the room is meant to feel energetic, I keep the base simple and let one or two pieces carry the color. A painted stripe, a mural, or a bright rug can do the heavy lifting. I would rather see one big, confident visual move than six small decorations fighting each other. That approach usually ages better too.
Read Also: Montessori Bathroom- Create an Independent Child's Space
Natural and Montessori-leaning
This style uses child-height shelves, visible materials, and a quieter palette. “Montessori-leaning” simply means the room is arranged so children can choose, use, and return toys on their own. It is not about making everything beige; it is about making the room understandable and independent-friendly. I like this style for families who want the room to look tidy even when toys are out.
For flooring and textiles, I usually keep it practical. A washable rug in the right size makes a bigger difference than a lot of people expect. In a medium room, that often means something in the 5x7 to 8x10 range, depending on furniture placement. The rug should anchor the room, not get lost under it.
Once the room has a visual direction, the last challenge is fitting all of that into the actual floor plan, especially when space is limited.
Make it work in small rooms, shared rooms, and nursery corners
Most families are not working with a perfect spare room. They are working with a corner of a bedroom, part of a basement, or a room that has to serve more than one child. That is where the layout matters more than the theme.
| Space type | Best move | What I would avoid |
|---|---|---|
| Small room | Use vertical storage, wall shelves, and one narrow play zone | Large loose furniture that eats the floor |
| Shared sibling room | Separate bins by child or activity, then give each a defined shelf section | One giant mixed toy area |
| Nursery-playroom hybrid | Keep the sleep zone calm and put toys in a distinct corner | Bright decor right next to the crib or sleep space |
| Basement or bonus room | Choose durable flooring, layered lighting, and closed storage for overflow | Thin rugs and fragile decor that will not last |
In small spaces, I also make the room work harder vertically. Wall hooks, floating shelves, and over-the-door storage can free up enough floor area to make the room feel twice as usable. A narrow cart can hold art supplies or puzzles without permanently claiming a corner. The goal is not to squeeze more in; it is to make the room easier to move through.
Safety matters more in a nursery-playroom than in a purely decorative kids’ room. Tall furniture should be anchored, cords should be out of reach, and anything heavy should live low. If you use open bins, keep the daily items light enough for a child to lift. A room can look beautiful and still be a bad setup if it is awkward or unsafe to use.
Once the layout and constraints are clear, I spend the budget in a very specific order so the room feels finished without wasting money.
Spend in the right order, not the prettiest order
As a planning framework, I usually split toy room budgets into three levels. These are not rigid rules, just a realistic way to decide what gets priority first.
| Budget range | What it can cover | Best use of the money |
|---|---|---|
| $100-$250 | Bins, labels, a washable rug, wall hooks, decals, paint touch-ups | Fast refresh for an existing room |
| $250-$800 | Cube storage, a child-sized table, better lighting, shelves, seating | Functional setup for a room that is used daily |
| $800-$2,500 | Built-ins, flooring updates, custom seating, electrical or lighting improvements | A long-term room that needs a bigger reset |
If the budget is tight, I would spend first on storage, then flooring, then lighting. Decorative items come after that. A room can still look thoughtful with plain bins and a clean rug; it does not look good if the storage system fails on day three. If the room already works, then it is worth paying for personality pieces like a mural, art prints, or a special reading chair.
I also suggest measuring shelves and bins before buying anything decorative. A lot of wasted money comes from stylish containers that do not actually fit the cube unit or closet shelf you already own. The room looks polished only when the pretty parts and the practical parts line up. That is the point where the setup starts to feel finished rather than assembled.
The details that keep the room useful after the first week
The real test is not how the room looks on day one. It is whether it still works after toys have been pulled out, mixed together, and left on the floor for a week. The rooms that hold up best usually pass a few simple checks:
- Can a child put most toys away without adult help?
- Can I reset the room in about 10 minutes?
- Are the most-used toys visible instead of buried?
- Does the room still feel calm when a few things are left out?
- Can I swap in a new toy rotation without reorganizing the whole room?
I also recommend a small seasonal edit every 3 months. Pull out broken pieces, donate toys nobody reaches for, and move outgrown items into storage. The room stays lighter, and the toys that remain become more interesting because they are not competing with everything else. That is usually the difference between a room that looks cute and a room that actually supports play.
If you want the short version, build the room around real play, keep storage child-friendly, and make every decorative choice earn its place. That formula gives you a toy room that feels playful on purpose, not chaotic by accident.