
A DIY Montessori playground works best when it feels calm, usable, and easy for a child to navigate without constant adult direction. In this guide, I break down how to plan the layout, choose the right materials, build safe climbing and sensory areas, and keep the space practical for everyday use. I also include realistic budget ranges so the project stays grounded in what actually fits a typical U.S. home.
The essentials for a backyard Montessori setup
- Start with function, not volume. A few well-placed features beat a crowded yard.
- Zone the space. Movement, nature, and practical-life areas should each have a clear purpose.
- Use low, open-ended equipment. Children get more out of a simple climber, balance path, or digging spot than a giant fixed structure.
- Protect the fall zone. Surface depth and spacing matter more than decorative extras.
- Build in phases. A starter setup can begin around $150-$500, while a more complete backyard often lands around $1,500-$4,000+.
What makes a Montessori-inspired playground different
The big difference is that the space is designed as a prepared environment, not a toy collection. I want children to be able to move, choose, repeat, and reset their own activities without needing an adult to keep turning the experience into a performance. That means fewer flashy items and more low, open-ended features that support independence, concentration, and practical use.
This is also why the outdoor area should not be treated as a separate “play zone” that only matters when someone is bored. The point is to make the outside space part of daily life: climbing, watering, sweeping, digging, observing, carrying, and resting. NAEYC is clear that children need daily, sustained play both indoors and outdoors, and that lines up well with a Montessori approach where movement and choice are built into the environment rather than added on as entertainment.
In practice, that means I always ask one question first: what will the child do here on an ordinary Tuesday? If the answer is not obvious, the setup is probably too complicated. Once that principle is in place, layout becomes a practical exercise instead of guesswork.
How I would map the yard before buying anything
I start by dividing the yard into simple zones instead of shopping for equipment right away. That keeps the project honest. A well-planned 120-square-foot corner can be more useful than a bigger space filled with items that fight for attention.
| Zone | What belongs there | Why it works |
|---|---|---|
| Movement zone | Low climber, balance beam, stepping stones, ramp | Supports repeated gross motor practice without feeling crowded |
| Nature zone | Raised bed, pots, bird bath, bug hotel, small watering station | Encourages observation and care, which fits Montessori practical life |
| Practical-life zone | Mud kitchen, broom hook, child-size bench, wash bin, tool shelf | Lets the child use real tools and clean up independently |
| Calm zone | Shade, small chair, rug, reading basket, quiet corner | Gives the yard a place to slow down instead of constantly ramping up |
When I map the yard, I also check three things before spending money: where the strongest sun hits, where water collects after rain, and where adults naturally stand when supervising. Those details matter because a beautiful setup that bakes in afternoon sun or floods after a storm will not get used for long. Once the zones are set, the next step is deciding what actually deserves space in each one.
Build the core elements in the right order
The most effective Montessori-style yards are not built around one giant feature. They are built around a small set of pieces that children can use in different ways across the week. I usually think in terms of movement, nature, and practical life.
Movement that repeats without boredom
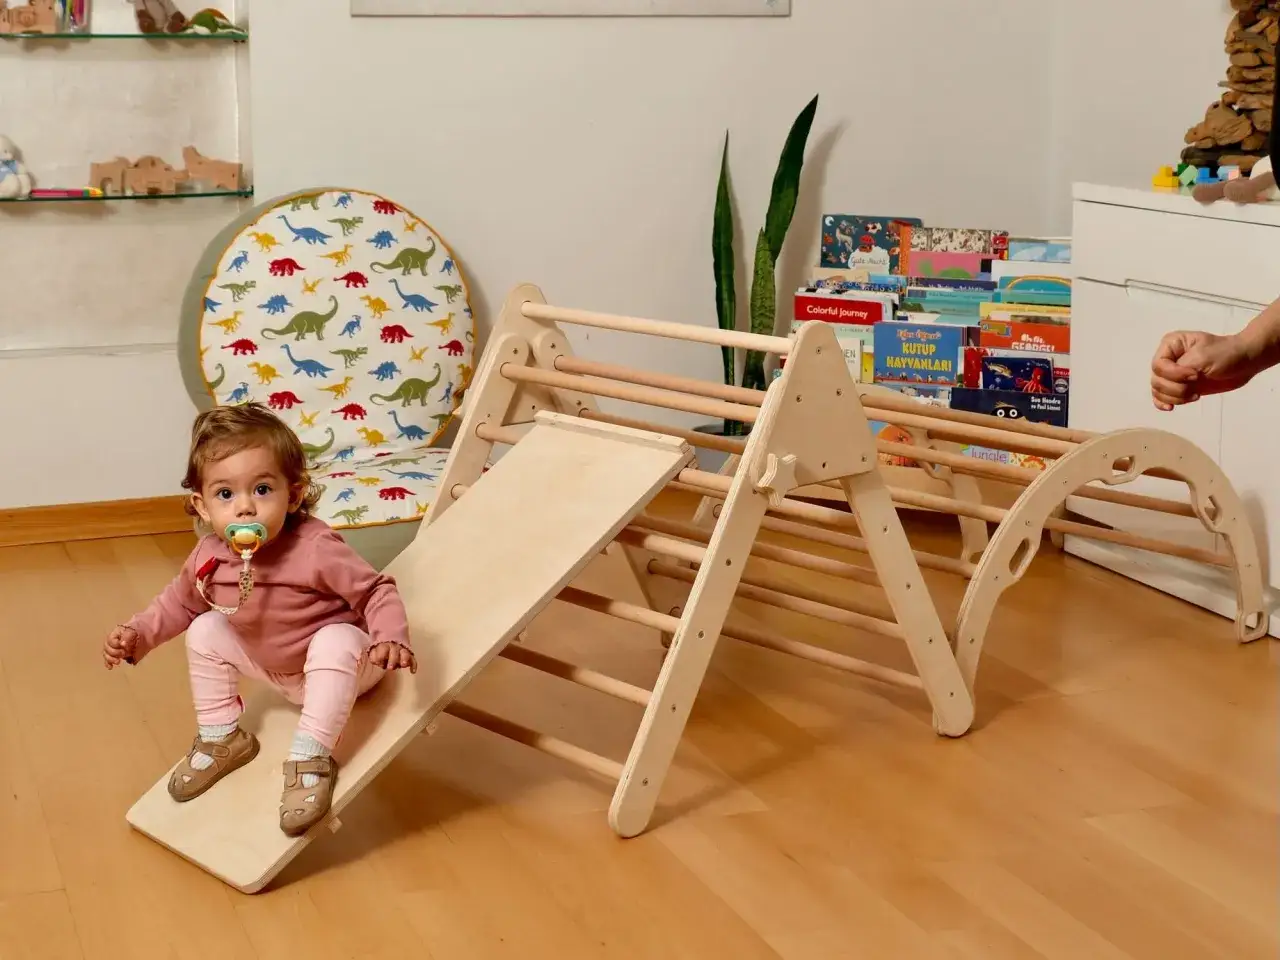
For movement, I prefer low climbers, a short balance beam, stepping stones, or a simple ramp over a tall, highly processed structure. Children do not need complexity as much as they need repetition. A child who can climb up, turn around, and come down safely will often use the same element dozens of times in one session, which is exactly the kind of self-directed practice a Montessori environment should encourage.
If you have a toddler, keep the first movement pieces close to the ground and easy to understand at a glance. If you have older siblings, add a slightly harder balance challenge or a path that requires careful foot placement. The idea is to let the yard grow with the child instead of forcing the child to adapt to a fixed amusement-park setup.
Nature and practical life at child height
This is where the Montessori influence becomes most visible. A child-size watering can, a small broom, a plant tray, or a raised garden bed often gets more daily use than a big plastic toy. These are ordinary tools, but for a child they become meaningful because they are sized correctly and available at the right height.
A mud kitchen is especially useful because it combines sensory play, pretend cooking, water work, and cleanup. Add a shallow bin, a few sturdy cups, and a shelf for tools, and the area immediately feels more purposeful. I like these stations because they are easy to reset and do not require a battery, a script, or adult-led entertainment to stay interesting.
Read Also: Colorful Gender Neutral Nursery - Design Tips That Grow With Baby
Loose parts that invite self-directed play
Loose parts are underrated outdoors. Think logs, wide planks, baskets, pinecones, scoopers, buckets, and large smooth stones that are safe for the child’s age. These pieces allow open-ended construction and problem-solving, which is much closer to how children naturally experiment. The catch is that they need order, not clutter. A single basket of loose parts is useful; a yard full of random stuff is not.
If I had to narrow the core build to just five items, I would pick: a low climber, a balance path, a water or mud station, a raised planting area, and a storage spot. That combination gives movement, care, sensory feedback, and independence in one compact setup. From there, safety becomes the next non-negotiable layer.
Keep the space safe enough for everyday use
This is the section where I get very practical, because backyard safety is not about fear. It is about removing the kinds of hazards that turn ordinary play into preventable injury. The CPSC's home playground handbook is very clear that surfacing, spacing, and fall zones matter far more than decorative details.
| Safety item | What I would use at home |
|---|---|
| Protective surfacing | 9 inches of loose-fill material for equipment up to 8 feet high; 6 inches for equipment under 4 feet high |
| Use zone | At least 6 feet in all directions around equipment |
| Swing clearance | Much larger than a static climber; the surfacing must extend in front of and behind the swing path |
| Spacing between structures | Play structures more than 30 inches high should be spaced at least 9 feet apart |
| Entrapment gaps | Openings should be smaller than 3.5 inches or larger than 9 inches |
I also avoid placing elevated equipment over bare concrete, asphalt, or plain grass and dirt, because those surfaces do not absorb impact the way a proper play surface does. If you choose loose-fill material such as wood chips, mulch, sand, or pea gravel, keep in mind that it compacts and shifts over time, so it needs to be checked and refreshed. That is one reason I like to mark the correct depth on support posts; it makes maintenance much easier to see.
Two other points matter in a home setup. First, overbuilt equipment is usually the wrong move for a backyard Montessori environment, because it creates more hazard than value. Second, if you plan to add any permanent structure, check local rules first, because permit and setback requirements vary by city. Once the safety layer is solved, the choice of materials starts to matter a lot more.
Choose materials that age well in American backyards
I tend to favor materials that feel natural, hold up in the weather, and are easy to maintain without turning into a maintenance project every month. A Montessori-inspired outdoor area should age gracefully, not look good for three weeks and then become annoying to own.
| Material | Best use | Main advantage | Tradeoff |
|---|---|---|---|
| Cedar or redwood | Climbers, benches, garden borders | Warm look, good durability, natural feel | Costs more than basic lumber |
| Pressure-treated wood | Framing, edging, larger builds | Affordable and sturdy | Needs careful sealing and regular inspection |
| Plastic or composite | Toddler accessories, bins, lightweight pieces | Easy to clean, low maintenance | Can feel less tactile and more generic |
| Loose natural parts | Logs, planks, stones, baskets, scoops | Open-ended, inexpensive, highly flexible | Needs clear storage and supervision |
| Loose-fill surfacing | Under and around climbable pieces | Essential impact absorption when properly maintained | Must be replenished and raked |
If your climate is wet, drainage matters as much as the material itself. If your climate is hot, shaded zones and cooler-touch surfaces matter more than how photogenic the setup looks. In my experience, the best outdoor spaces are not the fanciest ones; they are the ones that stay comfortable enough to use in real weather. That brings the project to the part most families need to plan carefully: money.
Plan the project in phases so it stays affordable
The smartest way to build a Montessori-style backyard is to treat it like a phased project. Start with the highest-use, lowest-regret pieces first, then add the extras once you know how your child actually uses the space. I would rather see a family complete a good starter yard than overcommit to a big build that stays half-finished.
| Budget tier | Typical spend | What it can cover | Best for |
|---|---|---|---|
| Starter | $150-$500 | Sandbox or digging bin, a balance beam, a small bench, pots, basic storage, mulch border | Small yards, renters, first-time setups |
| Growing | $500-$1,500 | Low climber, mud kitchen, watering station, shade sail, raised bed, better surfacing | Families who want daily use without major construction |
| Comprehensive | $1,500-$4,000+ | Custom surfacing, permanent path, playhouse or larger climber, sturdy storage, drainage upgrades | Homeowners ready for a long-term outdoor room |
The hidden cost is usually not the toy itself. It is the surfacing, edging, drainage, and storage that make the space usable over time. I would budget for those first, then decide what kind of climber or station the remaining money supports. If the budget feels tight, start with one zone and expand only after the child has shown real interest.
Avoid the mistakes that make outdoor spaces look nice but get ignored
I see the same problems over and over: too much gear, too little structure, and a layout designed around adult taste instead of child use. That is how backyard projects become visually appealing but practically dead.
- Buying tall equipment too early. Low, repeated movement is more useful than a structure a child can only use with help.
- Overcrowding the yard. Children need room to move between activities, not just around them.
- Forgetting storage. Loose parts are only Montessori-friendly when they have a clear home.
- Ignoring shade and drainage. A muddy or scorching setup loses daily usability fast.
- Turning everything into decoration. If the child cannot carry, pour, sweep, climb, or plant, the space is too passive.
The most common mistake is trying to make the yard impressive instead of usable. A good outdoor environment feels modest at first glance and quietly excellent once a child starts moving through it. If that is the standard, the last step is deciding what to build first when the yard is small or the budget is limited.
What I would build first in a small yard
If I were starting from zero, I would keep the first version simple: safe ground surface, one movement challenge, one practical-life station, and one storage point. That order gives you the most value per dollar because it covers motion, independence, and cleanup from day one.
- First: install or define the play surface so the space feels intentional and safe.
- Second: add a low climber, stepping path, or balance feature that the child can use alone.
- Third: build a water, gardening, or mud station that invites real work and sensory play.
- Fourth: give tools and loose parts a place to live so the yard stays organized.
That sequence creates a backyard that can grow with the child instead of being replaced every time the child gets older. If you keep the design simple, maintain the surfacing, and let the materials do real work, the space will feel less like a themed project and more like part of the home.